You are sitting like a shrimp.
Right now, as you’re reading this, your shoulders are probably rolled forward, your neck is craned toward the screen, and your spine looks like a question mark. You’ve been working from your couch for three hours, or hunched over a laptop at your dining table, and you don’t even notice the dull ache in your lower back anymore because it’s just… always there.
Welcome to the Laptop Hunch.
I’m a physical therapist. I spent eight years treating office workers with herniated discs, chronic neck pain, and carpal tunnel syndrome before I became a freelancer myself. And here’s what I learned: Your $12,000 medical bills for physical therapy could’ve been prevented by $300 worth of furniture.
You don’t need a $1,200 Herman Miller Aeron chair. You don’t need a $800 motorized standing desk. You definitely don’t need a “gaming chair” with RGB lights and a logo that screams “I’m 14 and my parents bought this for my Fortnite career.”
You need five things:
- A chair that supports your lumbar spine
- A screen at eye level
- A keyboard that doesn’t force your wrists into painful angles
- A desk at the correct height
- Lighting that doesn’t make you look like a hostage on Zoom calls
Total cost: $300. Total time to set up: 20 minutes. Total reduction in neck pain over the next year: life-changing.
Let me show you exactly what to buy, why it works, and how to set it up so you can work eight hours without feeling like you’ve been hit by a truck.
The Problem: You Are Destroying Your Neck (And You Don’t Even Know It)
Let’s talk about Forward Head Posture (FHP), which is the medical term for “you’re sitting like a shrimp and your neck is paying for it.”
Your head weighs roughly 10-12 pounds when your neck is in a neutral position (ears aligned over shoulders). But for every inch your head moves forward, you add an additional 10 pounds of stress on your cervical spine.
The math:
- Head tilted forward 1 inch: 20-22 pounds of pressure
- Head tilted forward 2 inches: 30-32 pounds of pressure
- Head tilted forward 3 inches (typical laptop user): 40-42 pounds of pressure
You’re essentially carrying a toddler on your neck for eight hours a day.
This causes:
- Muscle strain: Your trapezius, levator scapulae, and suboccipital muscles are constantly overworking to hold your head up
- Disc compression: Your cervical discs (the cushions between your neck vertebrae) get squeezed, leading to herniation risk
- Nerve impingement: Compressed nerves cause tingling, numbness, or pain radiating down your arms
- Tension headaches: The suboccipital muscles at the base of your skull go into spasm
And it’s all because your laptop screen is 12 inches below where it should be.
[Image Tag: Side-by-side comparison illustration – Left: “The Shrimp Posture” showing person hunched over laptop with head forward, shoulders rounded, lower back curved. Right: “Neutral Spine Posture” showing person with ears aligned over shoulders, screen at eye level, 90-degree angles at elbows and knees.]
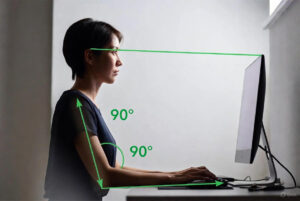
The 90-Degree Rule: The Science of Not Hurting.
Here’s the ergonomic gold standard for desk work, backed by OSHA, the American Physical Therapy Association, and literally every study on workplace musculoskeletal disorders:
The 90-Degree Rule:
- Elbows at 90 degrees: Your forearms should be parallel to the floor when typing
- Knees at 90 degrees: Your thighs parallel to the floor, feet flat on the ground
- Hips at 90 degrees (or slightly more): Your torso upright, lower back supported
The Eye-Level Rule:
- The top third of your screen should be at or slightly below eye level
- Your eyes should naturally land about 2-3 inches below the top of the screen when looking straight ahead
- The screen should be 20-28 inches away from your face (roughly an arm’s length)
Why this matters:
- 90-degree elbows prevent carpal tunnel (wrist extension under 15 degrees minimizes median nerve compression)
- 90-degree knees prevent lower back pain (distributes weight evenly across your pelvis)
- Eye-level screen prevents Forward Head Posture (keeps cervical spine neutral)
What you’re doing now: Working directly on a laptop means your screen is 10-15 inches too low, forcing your neck into 30-40 degrees of flexion for hours. This is like doing a plank with terrible form—you’re creating injury, not strength.
The Solution: The $300 Shopping List
I’m going to give you the exact items to buy. I’ve tested dozens of budget options over five years of treating remote workers. This is the minimum effective setup.
Item 1: The Chair – Mesh Task Chair (Check Price)
What to buy: Any mesh-back task chair with lumbar support and adjustable seat height. Specific models that work:
- HON Ignition 2.0 ($120-140 on sale at Staples)
- AmazonBasics Mid-Back Mesh Chair ($100)
- Alera Elusion Series Mesh ($110)
Why mesh, not leather or “gaming chairs”?
Mesh chairs have three advantages:
- Breathability: You won’t sweat through your shirt in hour six
- Spinal curvature support: The mesh contours to your lumbar curve (the natural inward curve of your lower back), whereas flat leather/fabric creates a gap
- Weight distribution: Mesh flexes, distributing pressure across your entire back instead of creating pressure points
Gaming chairs are a scam. They’re designed to look cool (racing stripes, logos, neon colors), not to support your spine. The “lumbar pillow” they include is a loose cushion that slides around and doesn’t provide consistent support. You’re paying $300-500 for branding, not ergonomics.
What to look for:
- Adjustable seat height: You need to get your feet flat on the floor
- Adjustable armrests (optional but helpful): Reduces shoulder strain
- Lumbar support (built into the backrest): A curve in the lower back area of the chair
- Seat depth: At least 16-18 inches so your thighs are fully supported
Setup tip: Adjust the seat height so your feet are flat on the floor and your knees are at 90 degrees. If your feet don’t reach the floor, use a footrest (or a cardboard box covered in duct tape—I don’t judge).
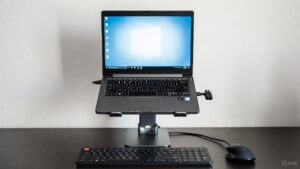
Item 2: The Laptop Riser – Adjustable Stand (Check Price)
What to buy:
- Rain Design mStand ($25-40, aluminum, rock-solid)
- Nulaxy Adjustable Laptop Stand ($20, cheaper, adjustable height)
- DIY option: A stack of textbooks or a cardboard box (free, ugly, but works)
Why you need this:
Your laptop screen is currently 10-15 inches too low. Raising it to eye level is the single most impactful change you can make for neck pain.
The catch: Once you raise your laptop, you can’t type on it anymore (your arms would be at a terrible angle reaching up to the keyboard). This is why Item 3 is mandatory.
Setup tip: The top of your screen should be at or slightly below eye level when you’re sitting upright. If you’re 5’4″, you’ll need less height than someone who’s 6’2″. Test it: sit in your chair, look straight ahead, and adjust the riser until your natural gaze lands about 2-3 inches below the top of the screen.
Item 3: External Keyboard & Mouse ($30-50)
What to buy:
- Logitech MK270 Wireless Combo (check price)
- Microsoft Bluetooth Desktop ($40, slightly nicer feel)
- Any mechanical keyboard + basic mouse ($40-60 if you prefer tactile keys)
Why you need this:
Once your laptop is raised, you need to type on something at desk level. An external keyboard keeps your elbows at 90 degrees and your wrists neutral (not extended or flexed).
Keyboard ergonomics:
- Your wrists should be straight (not bent up or down)
- Your forearms should be parallel to the floor
- Your shoulders should be relaxed (not hunched up or forward)
Mouse ergonomics:
- Keep the mouse close to your keyboard (don’t reach out to the side)
- Your wrist should stay neutral (not twisted or bent)
- Consider a vertical mouse if you already have wrist pain (adds $10-15)
Setup tip: Place the keyboard directly in front of you, centered with your body. The mouse should be immediately to the right (or left if you’re left-handed). If you’re reaching more than 6 inches to grab the mouse, you’re creating shoulder strain.
Item 4: The Desk – IKEA Linnmon or Equivalent ($60-100)
What to buy:
- IKEA Linnmon Table Top + Adils Legs ($50-70, 47″ × 24″ surface)
- Mainstays Basic Student Desk ($60 at Walmart)
- Any flat surface that’s 28-30 inches high
Why this specific height?
Standard desk height is 28-30 inches. This is designed to work with the 90-degree rule: when you sit in a chair with your feet flat on the floor, your elbows should be at desk height when bent at 90 degrees.
If you’re very tall (6’2″+) or very short (under 5’4″): Standard desks might not work perfectly. Add a footrest or use risers under the desk legs to adjust height by 2-3 inches.
What if I can’t afford a new desk?
Use your dining table. Most dining tables are 28-30 inches high—they work fine. The only downside is lack of depth (dining tables are often only 30 inches deep, whereas desks are 24-30 inches). You’ll just have less room for clutter.
Setup tip: Position your desk so you have good natural light (near a window if possible, but not directly in front of it—glare on your screen causes eye strain). If you do video calls, make sure the background behind you isn’t your unmade bed or a pile of laundry.
Item 5: Lighting – Ring Light or Desk Lamp ($15-30)
What to buy:
- Neewer 10″ Ring Light (USB-powered, clips to desk) Check Price
- Basic LED Desk Lamp ($15-20, adjustable arm)
- DIY option: Point a regular lamp at a white wall to “bounce” light onto your face (free if you already own a lamp)
Why this matters:
If you do video calls (Zoom, Teams, client meetings), bad lighting makes you look tired, unprofessional, or like you’re conducting the meeting from a cave. Good lighting:
- Reduces eye strain (you’re not squinting at a dim screen)
- Makes you look awake and professional on camera
- Improves focus (bright light signals to your brain it’s “work mode”)
The rule: Light should come from in front of you and slightly above, not behind you (that creates a silhouette) or from directly overhead (that creates harsh shadows under your eyes).
Setup tip: If you’re using a ring light, place it behind your laptop/screen so it illuminates your face evenly. If you’re using a desk lamp, position it to the side and point it at a white wall to create soft, diffused light.
[Image Tag: Before/after comparison of video call lighting – “Before” shows person backlit by window (face in shadow), “After” shows person with ring light providing even front lighting]
The Total Shopping List Breakdown
| Item | Recommended Product | Price | Why You Need It |
|---|---|---|---|
| Chair | HON Ignition 2.0 or AmazonBasics Mesh | $100-120 | Lumbar support prevents lower back pain |
| Laptop Riser | Nulaxy Adjustable Stand | $20-25 | Raises screen to eye level, fixes neck pain |
| Keyboard & Mouse | Logitech MK270 Wireless Combo | $25-30 | Keeps elbows at 90 degrees, prevents wrist strain |
| Desk | IKEA Linnmon + Adils Legs | $60-70 | Correct height for 90-degree rule |
| Lighting | Neewer 10″ Ring Light or desk lamp | $15-30 | Professional video calls, reduces eye strain |
| TOTAL | $220-275 | Leaves $25-80 for adjustments/accessories |
Optional add-ons if you have budget left:
- Monitor (instead of laptop riser): $100-150 for a 24″ 1080p monitor (better than a laptop screen for eye strain)
- Footrest: $15-20 if your feet don’t reach the floor
- Cable management clips: $8 (keeps cords organized)
- Desk pad/mat: $15 (protects desk surface, feels nicer than bare laminate)
The Setup: How to Arrange It All for Neutral Spine.
You’ve bought the stuff. Now let’s put it together so it actually works.
Step 1: Assemble the Desk
IKEA Linnmon is literally four screws. Attach the legs to the tabletop. Put it near a window if possible. Done.
Step 2: Position the Chair
Sit in the chair. Adjust the seat height so your feet are flat on the floor and your knees are at 90 degrees. Your thighs should be parallel to the ground.
If your chair has armrests, adjust them so your elbows rest comfortably at 90 degrees (armrests should support your forearms without lifting your shoulders).
Step 3: Set Up the Laptop Riser
Place the riser on your desk. Put your laptop on it. Sit in your chair and look straight ahead. The top third of the screen should be at or slightly below eye level. Adjust the riser height if needed.
Step 4: Add the Keyboard and Mouse
Place the external keyboard directly in front of you on the desk surface (not on the riser—that’s too high). The keyboard should be about 4-6 inches from the edge of the desk. Put the mouse immediately next to the keyboard.
When you type, your elbows should be at 90 degrees and your wrists should be straight (not bent up or down).
Step 5: Position the Lighting
If using a ring light, clip it to the desk behind your laptop or mount it on a small tripod. If using a desk lamp, place it to the side and angle it toward a white wall to create soft, bounced light. Test it on a Zoom call—you should see even lighting on your face with no harsh shadows.
Step 6: The Final Check (The 90-Degree Test)
Sit in your chair. Check:
- ✅ Feet flat on the floor (knees at 90 degrees)
- ✅ Elbows at 90 degrees when typing (forearms parallel to floor)
- ✅ Eyes looking straight ahead land 2-3 inches below the top of the screen
- ✅ Lower back supported by the chair’s lumbar curve
- ✅ Shoulders relaxed (not hunched forward)
If everything checks out, congratulations—you now have a budget home office setup that won’t destroy your body.
The Verdict: You Don’t Need a Herman Miller. You Need Alignment.
I’ve treated patients who spent $3,000 on a Herman Miller Aeron and still had chronic neck pain. Why? Because they were using it with a laptop on the desk, screen 12 inches too low, hunched like a shrimp.
The chair doesn’t fix bad posture. Alignment fixes bad posture.
A $120 mesh task chair with the screen at eye level will prevent more injuries than a $1,200 executive chair with the screen at nipple level.
The companies selling $800 standing desks and $500 ergonomic keyboards want you to believe that expensive = effective. It’s not true. What’s effective is the 90-degree rule, a screen at eye level, and lumbar support.
You can achieve all three for $300.
What If I Already Have Neck Pain?
If you’re already experiencing chronic pain (pain lasting more than 3 months), numbness, tingling, or radiating pain down your arms, see a physical therapist or doctor. This guide prevents future injury—it doesn’t treat existing damage.
That said, most early-stage neck pain (the “I’m sore at the end of the day” kind) will improve dramatically within 2-4 weeks of switching to a proper setup. Your muscles need time to adapt to the new posture.
Exercises to accelerate recovery:
- Chin tucks: Sit upright, pull your chin straight back (like you’re making a double chin). Hold 5 seconds. Repeat 10 times, 3x per day. This strengthens the deep neck flexors that counteract Forward Head Posture.
- Scapular squeezes: Sit upright, squeeze your shoulder blades together (like you’re pinching a pencil between them). Hold 5 seconds. Repeat 10 times, 3x per day. This strengthens the rhomboids and mid-traps, pulling your shoulders back.
- Cat-cow stretch: On hands and knees, alternate arching your back (cow) and rounding it (cat). 10 reps, 2x per day. This mobilizes your thoracic spine.
The Bottom Line.
You’re a freelancer. You work from home. You probably can’t afford a $2,000 ergonomic setup, and honestly, you don’t need one.
What you need:
- A $120 chair that supports your lower back
- A $25 stand that raises your screen to eye level
- A $30 keyboard and mouse so you can type at the correct height
- A $70 desk (or your existing dining table)
- A $20 ring light so you don’t look like a hostage on Zoom
Total: $265.
This setup will prevent thousands of dollars in medical bills, dozens of hours lost to pain, and the slow, grinding destruction of your cervical spine.
You don’t need to sit like a shrimp anymore.
Get the stuff. Set it up. Your 45-year-old self will thank you.